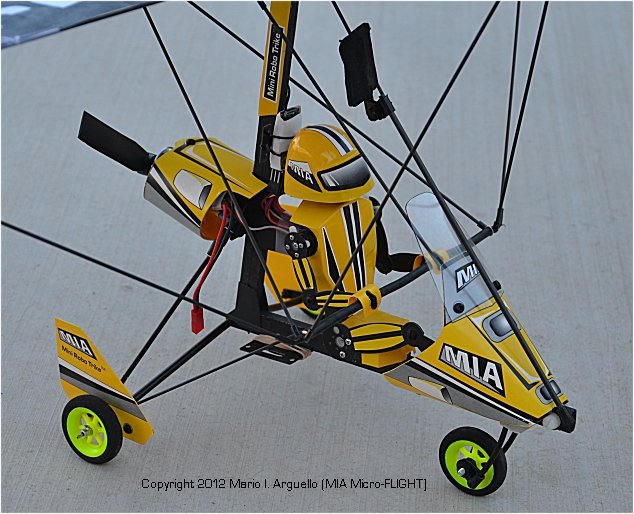
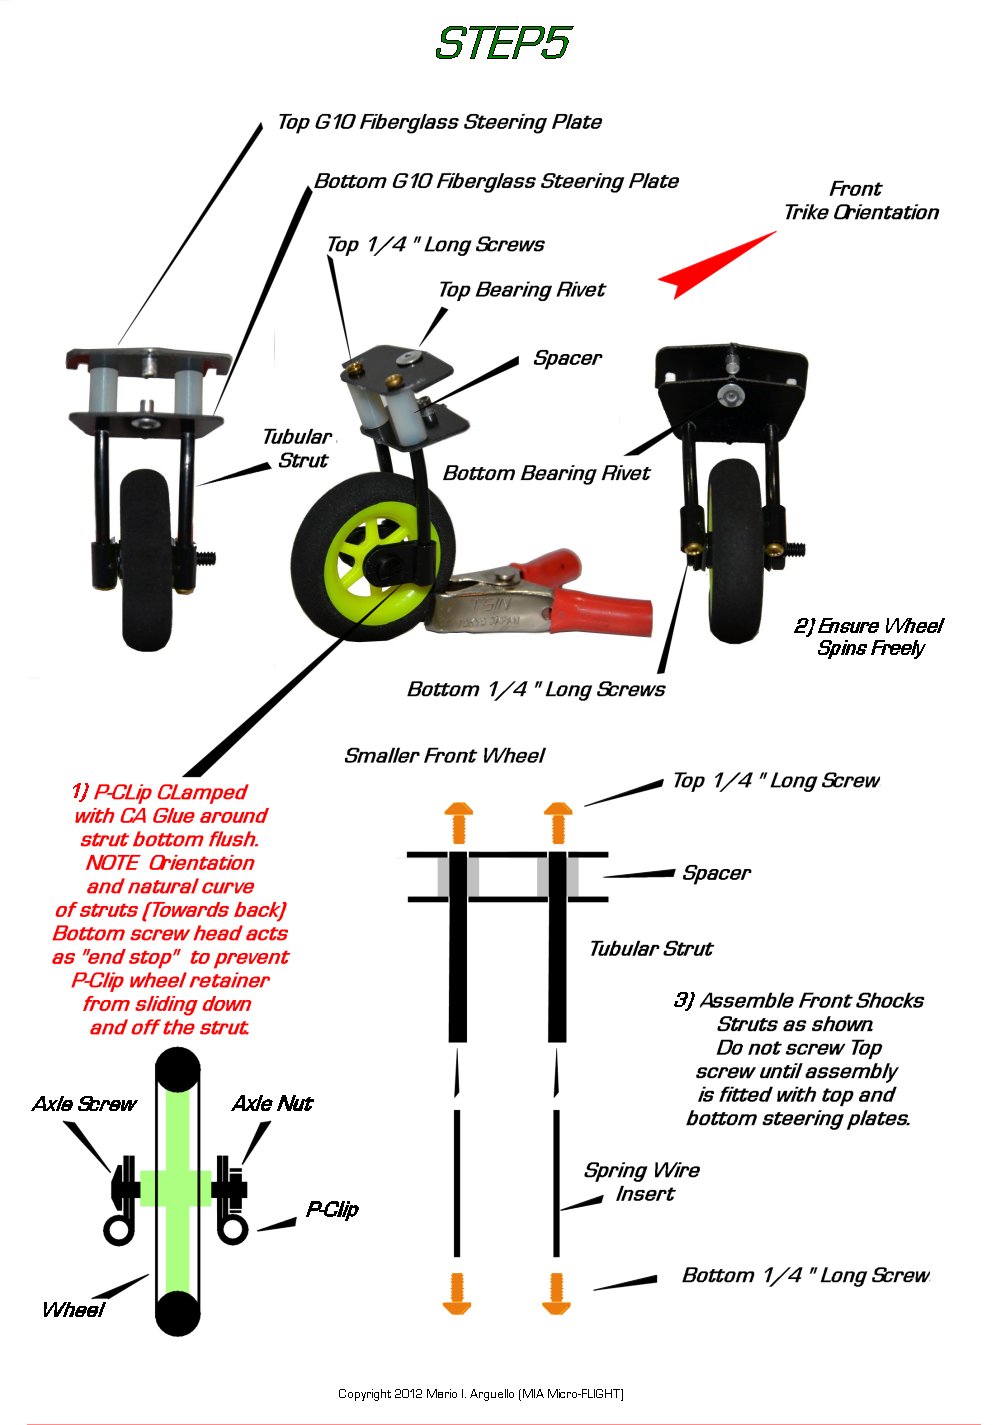
Front
Wheel P-Clips need to be individually Clamped with a bit
of CA Glue.
Once glue
dries and the P-Clip tabs are bonded together they form
the front
wheel axle and strut supports. This makes for a super
strong part.
The front
wheel needs to spin smoothly and to achieve this a small
spacer made from a larger plastic nut, supplied in the
Front Suspension Kit is required in between the outside
of the wheel and the inside of the P-Clip supports, one
per side. Make sure this does not bind as you tighten
the axle bolt and nut.
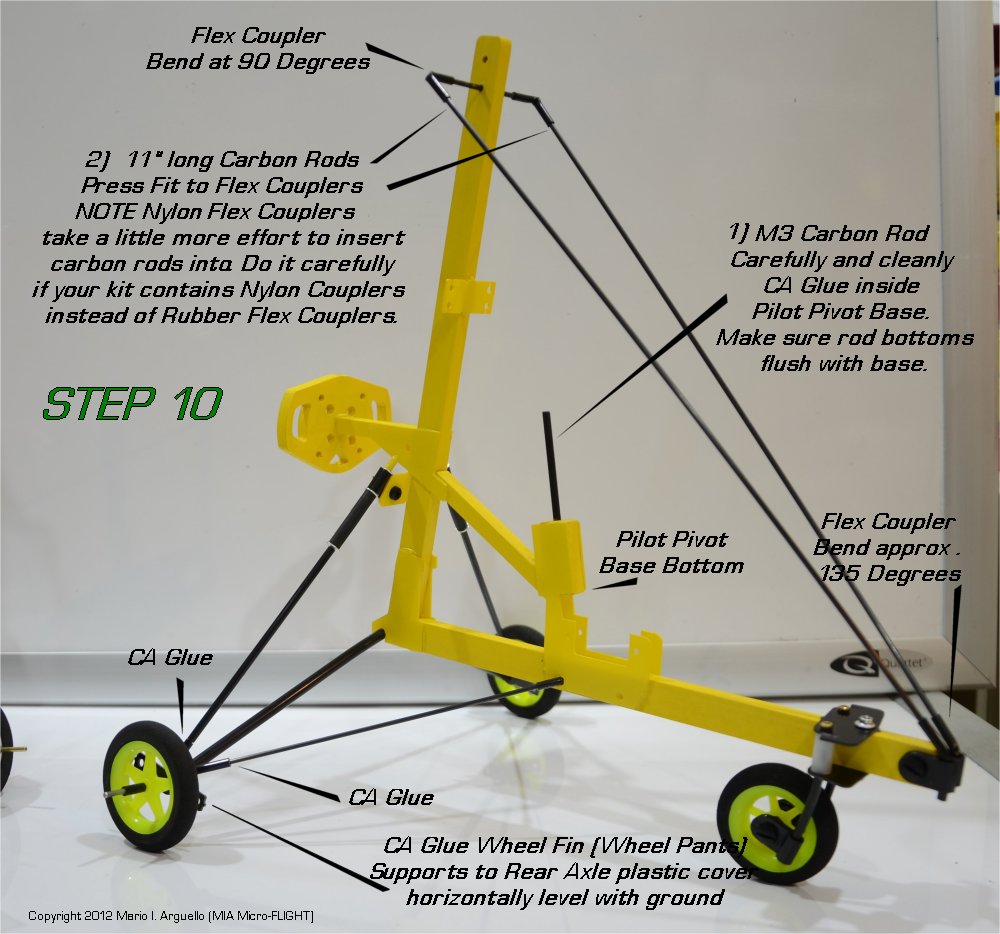
STEP 8 - Special Note!
The front steering
"assembly" also needs to pivot, on the frame base, smoothly.
Make sure this also does not bind, as the Pilot Leg Servo will need
to operate this without restriction, for precise steering.
2013 Bolt On-Hinged Version
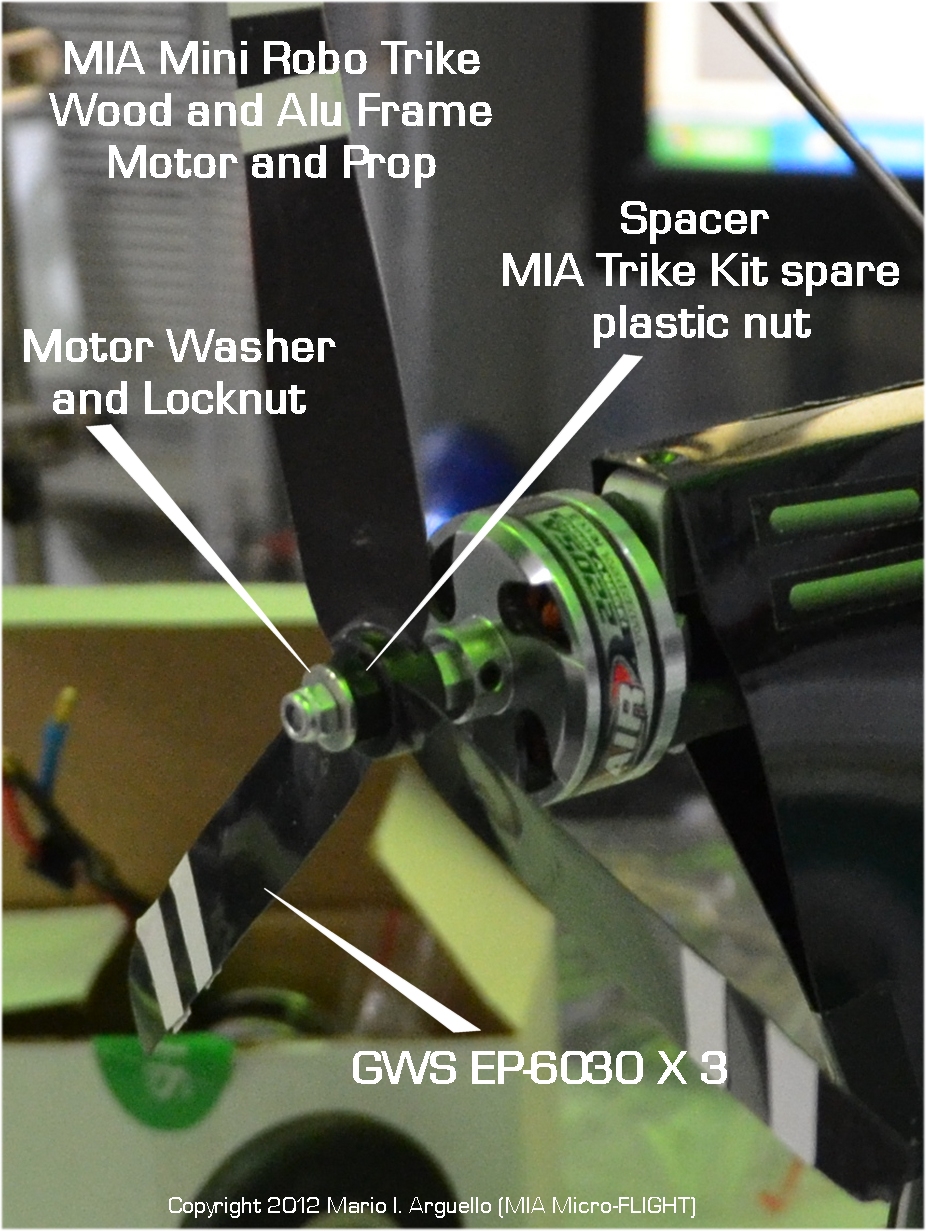
Prop to Motor Install
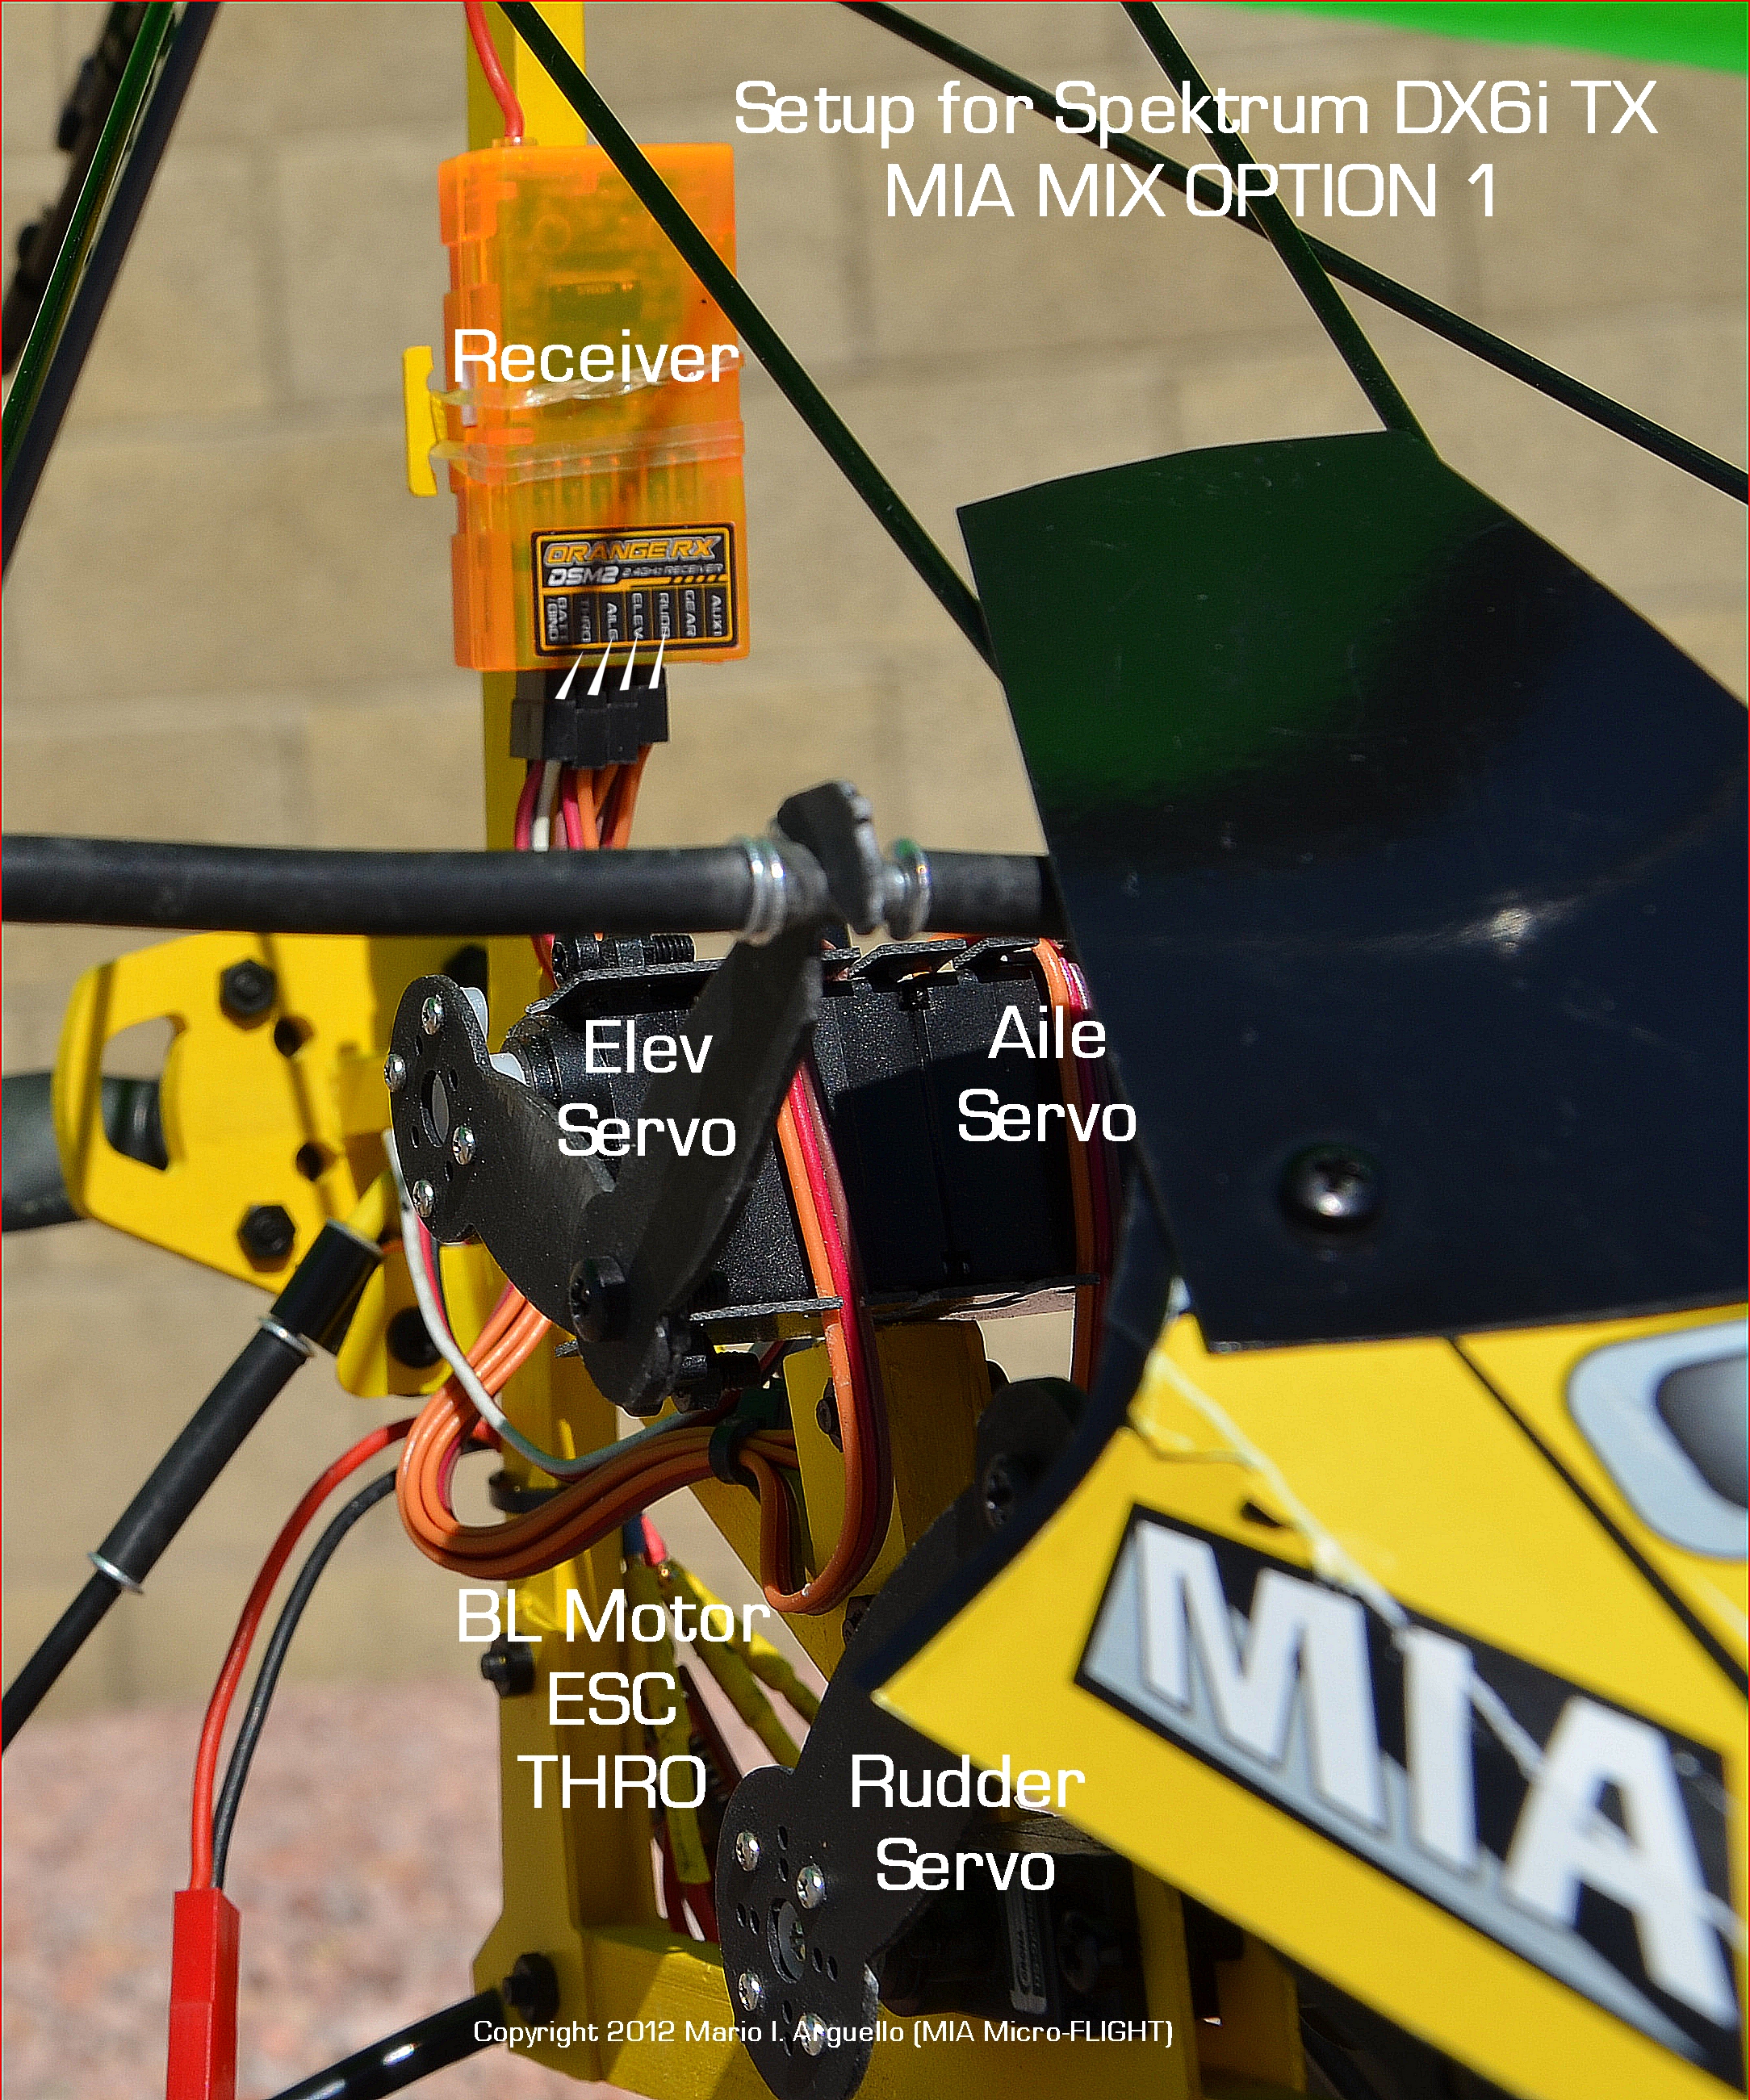
Electronics Install Illustration
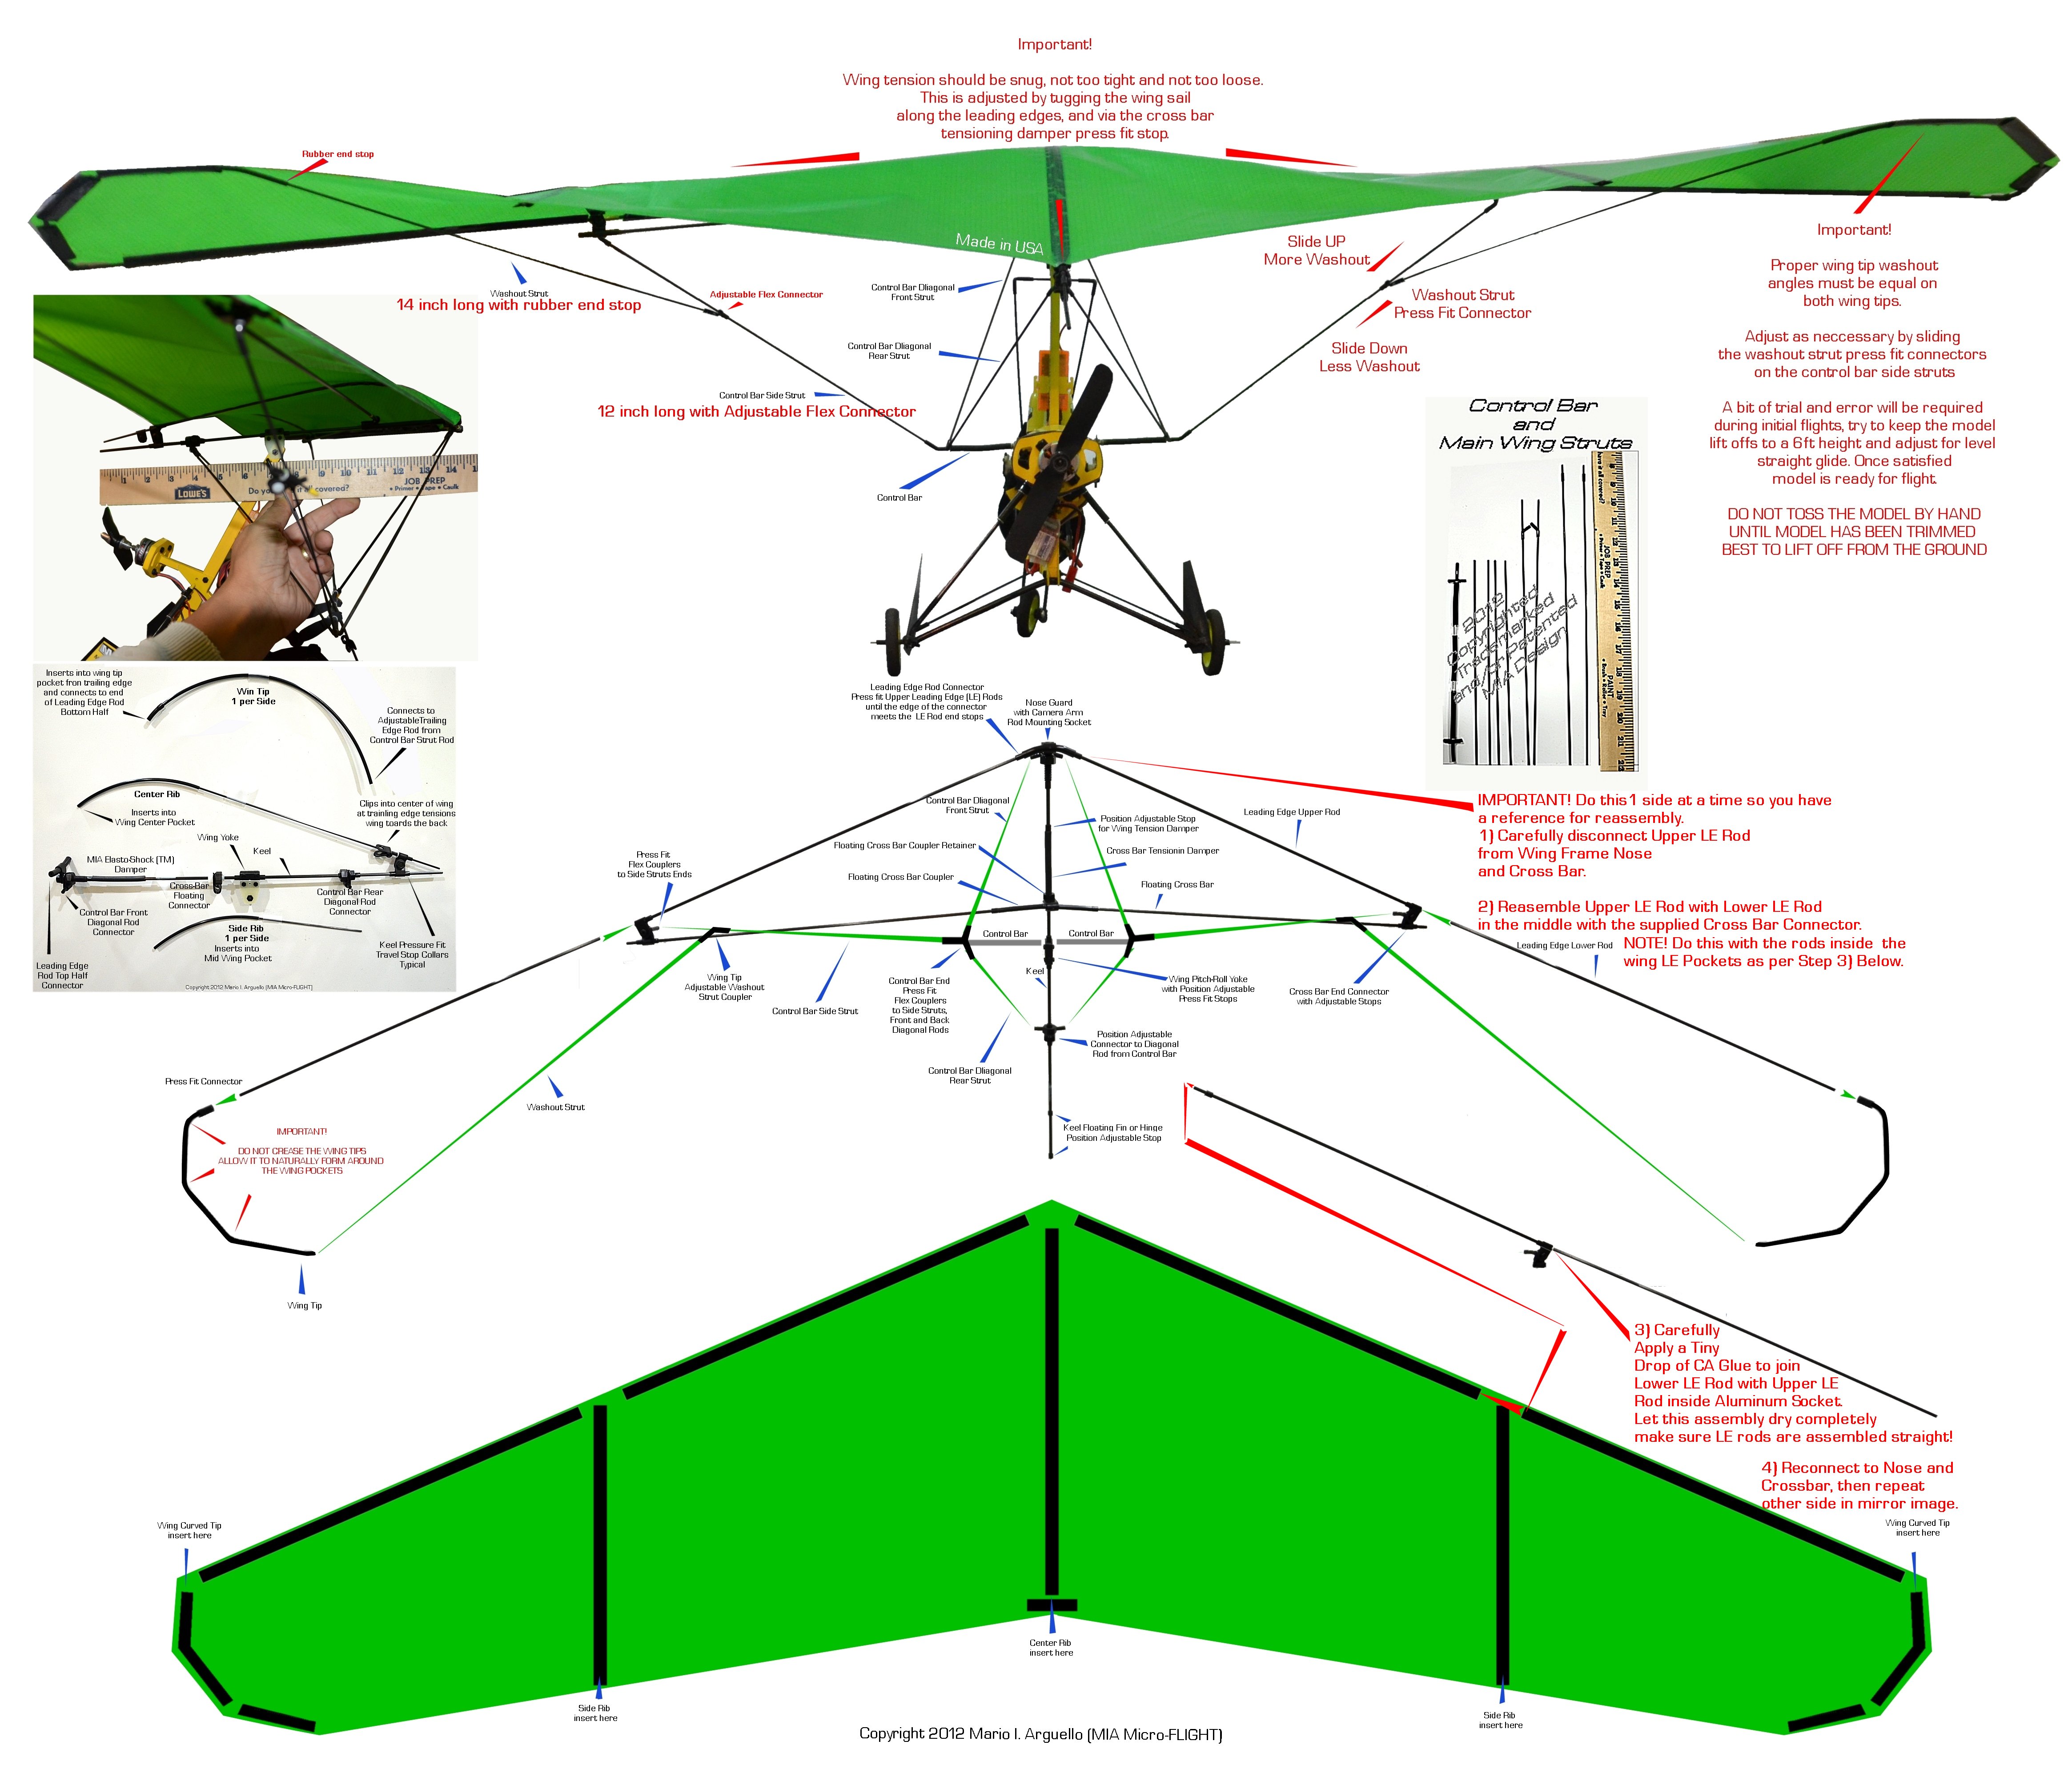
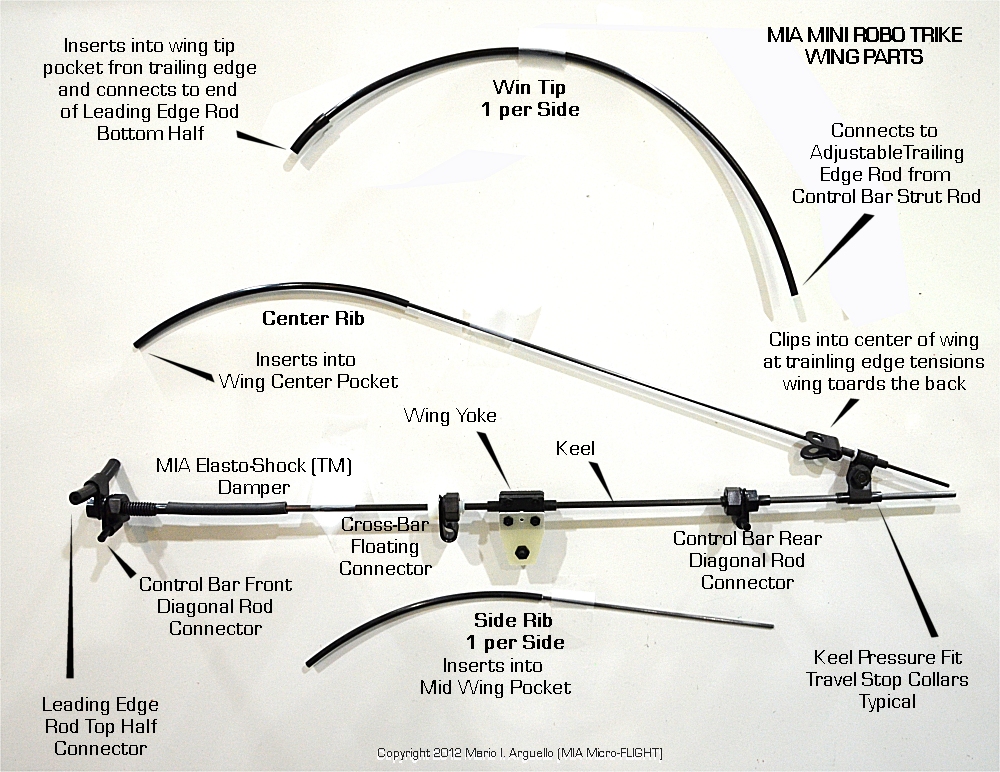
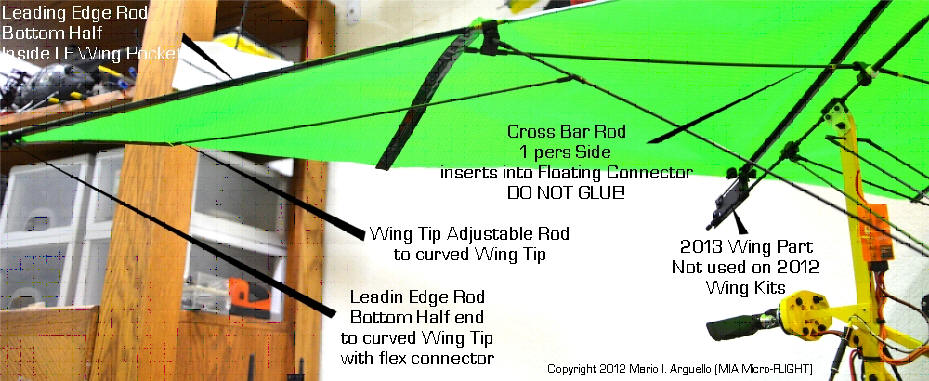
Wing Assembly
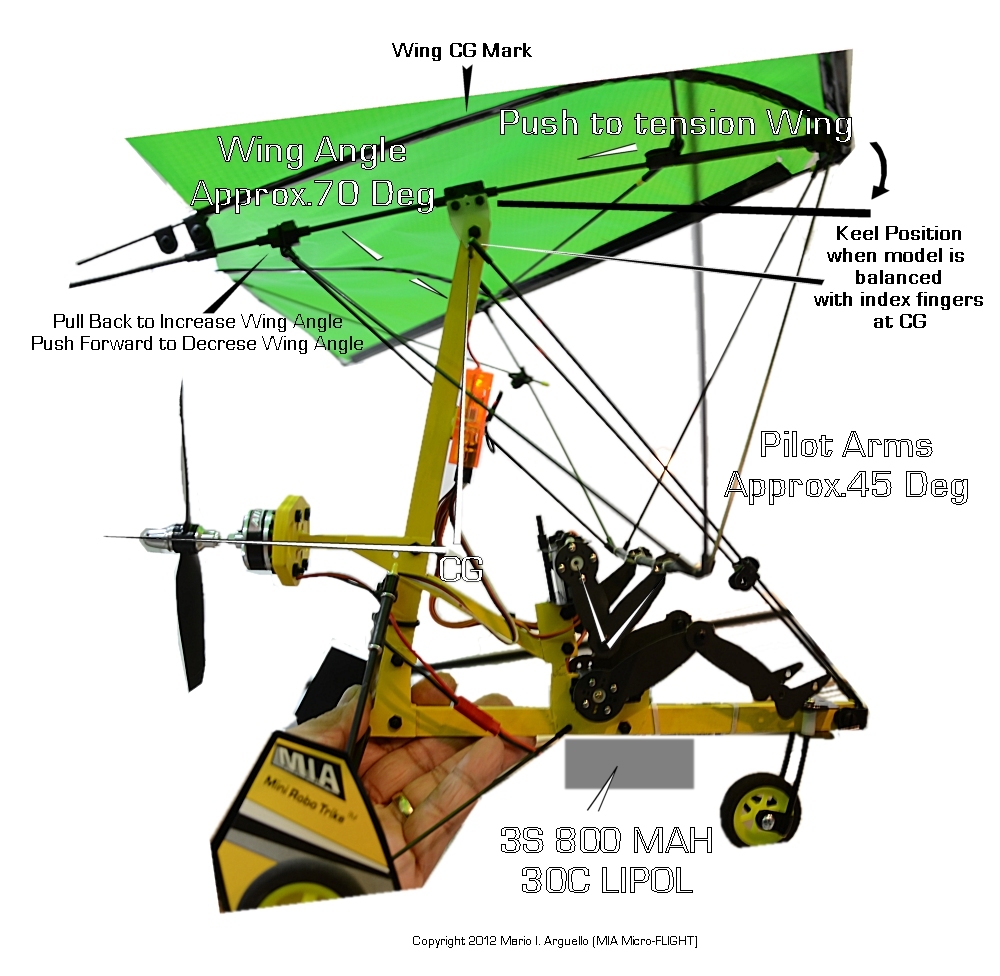
Wing CG and Critical Angles
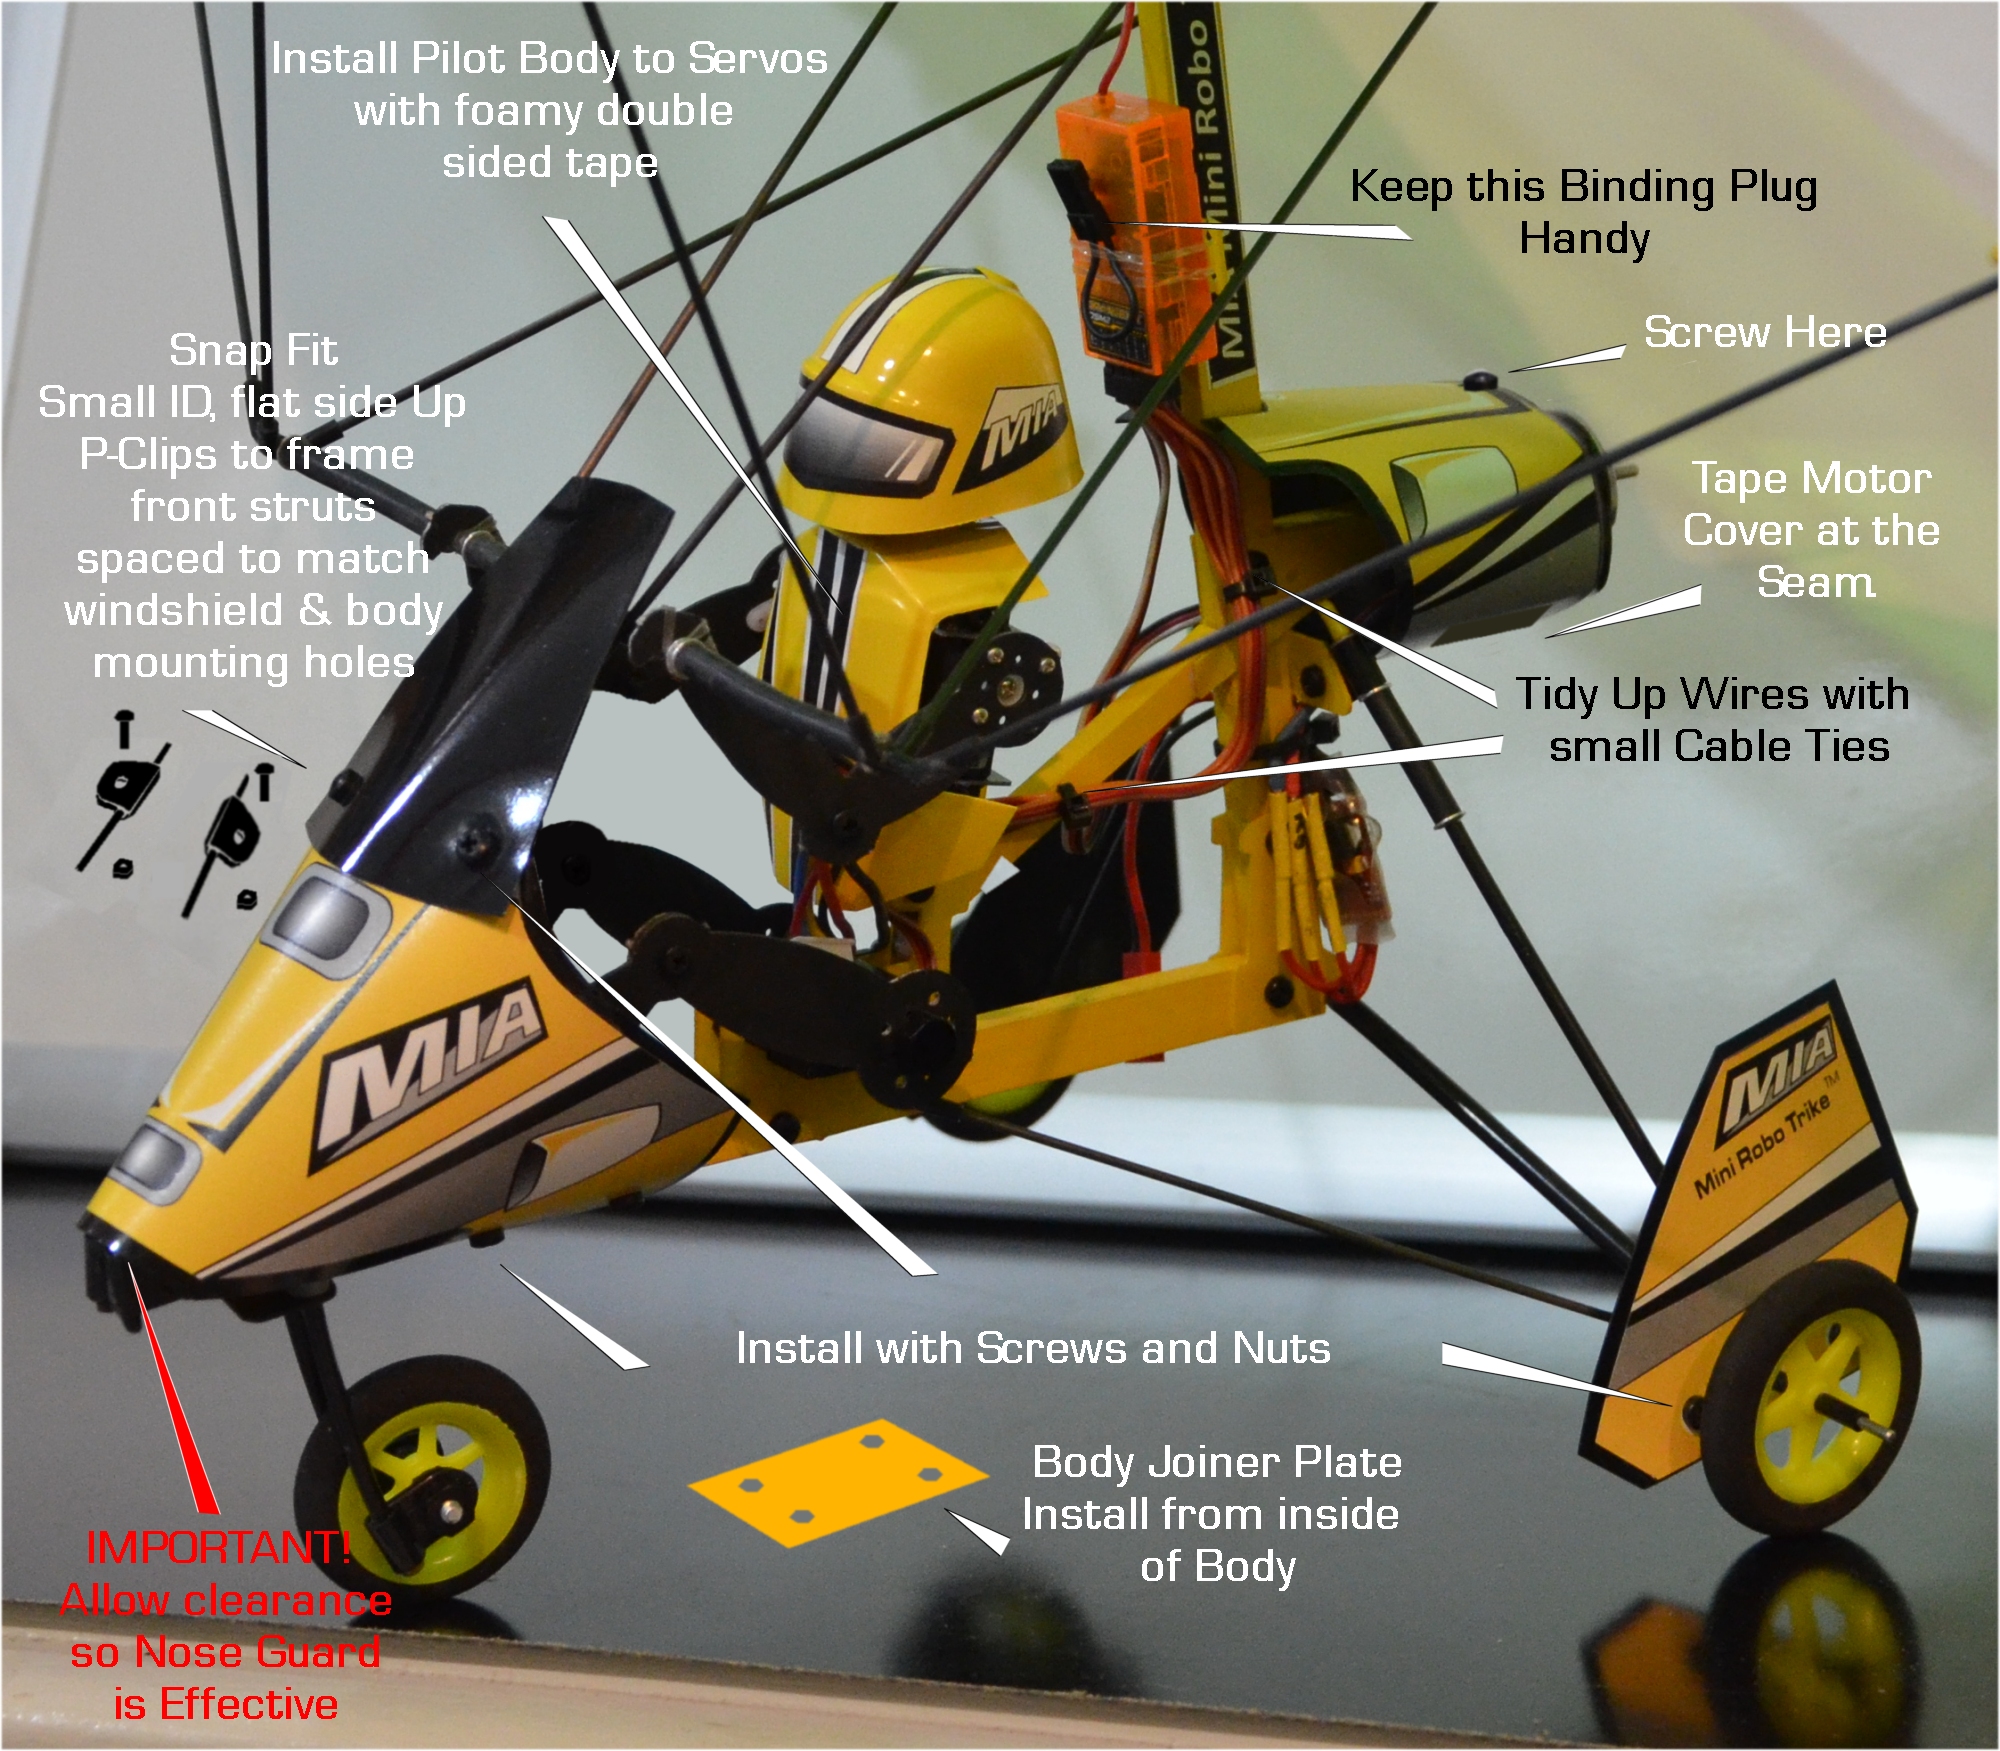
Pilot
and Trike Body, Wheel Fins
and Motor Cover
MOTOR INSTALL
To keep things simple, motor offset is not used. I don't use
any in all my videos.
However, 2-3 degrees of side offset and
same for up-down can be explored by user to find hand-TX Stick
control comfort zone. The control feel on the hands is
different for everyone and some people can compensate for
these offset values by feel or TX settings. But is is good to
have a physical value range and adjust from zero
offset reference. The motor can be offset, by using small
pieces of 1mm thick cardstock material as shims before
tightening the mounting screws.
CONTROL MIX OPTIONS SPEKTRUM DX6I TX
OPTION 1 MIA TRIKE DUAL MIX1, MIX2
This allows the use of the Mix Switch to select a high throw
on the servos by using dual mixing settings as per Option 1
chart below. This also allows the user three different control
comfort levels as follows:
Setting 1) With the MIX Switch 'On' and the ELE and
AILE at High Rates Switch On 100% . gives MAX throws on
the servos, but be careful not to push the TX ELE stick too
far as the control bar can hit the diagonal frame braces. Once
you get the model in the air you never use the max limits
anyway, provided the angle of attack on the wing is set as per
my videos, reference drawings, photos and or illustrations. I
use this setting in most of my videos because it is extra
sensitive and I like the faster response rate of the control
this way, especially for breeze days. For expert pilots
only.
Setting 2) With the MIX Switch 'On' and the ELE and
AILE at Low Rates Switch On 50%, gives Medium throws on
the servos, and this is the STANDARD control setting good as a
starting point for Beginners and just to get the feel for
the trike initial flights.
Setting 3) With the MIX Switch OFF, use the ELE and
AILE at High Rates for average flying.
The Rudder or steering Servo Rates are set at either
100 or 50 % and you can adjust further depending how
comfortable you get with the directional control. Important
that the front wheel control must not be too sensitive, so
takes offs and landings are more precise.
OPTION 2 PARAGLIDER FLAP-ELE MIX
This is a standard MIX setting that might
be more suitable for users already familiar with the control
of RC paragliders or paraplanes. It is setup as a dual aileron
with percentage differential, typically values of 75-100% are
good for the MIA Trike.
OPTION 1
MIA TRIKE DUAL MIX 1, MIX 2
(DX6I TX)
Pilot Torso Servos seen from the back: RIGHT SERVO ( RECEIVER ELEV CH. ) LEFT SERVO (RECEIVER AILE CH.)
SUB TRIM THRO 0 AILE 0 ELEV 0 RUDDER 0 GEAR 0 FLAP 0
FLAPS NORM FLAP 0 ELE 0 LAND FLAP 25 ELE 0
MIX1
ELE-FLAP ACT RATE D -40 U-40 SW ON TRIM INH
MIX 2
INH
DIFFERENTIAL
Dual Aileron Rate
75%
SETUP LIST
MODEL TYPE
ACRO
REVERSE THRO N AILE R ELEV N RUDD M GEAR N (not used) FLAP R (not used)
THROTTLE CUT
POSITION - INH
WING TAIL MIX
DUALAILE ACT
V-TAIL INH ELEVON INH
D/R COMBI
D/R SW: INH
TIMER
MDL1 MROBOTRK DOWN TIMER -10:00
SWITCH---TRAINER
RANGE CHECK
CHECK INH
POWER SETTING
B-US 247
MODULATION TYPE
AUTO DSM-X ENABLE
DSM-X AND DSM-2
STANDARD RECEIVERS
CONTRAST (if you have back lighted
transmitter screen)
50%
...
More Photos and Videos will be posted shortly, please come
back soon or E-mail me directly for assistance.
I am happy to announce that the 2013 version is now a
Bolt-On Frame design to make it easier for the user.
Nevertheless, RC Trikes, and in particular, the MIA Robo
Trikes (Real weight shift) require a bit of
knowledge in the setup and operation in order to fully
enjoy them.
Please don't hesitate to E-mail me direct with any
questions. I'll be glad to help you directly if you bought
one of these kits and I have not yet uploaded all the
instructions.
Note that my videos posted here on this page have also
information on the proper CG balance point, wing
tensioning and angles required for successful
flights.
IMPORTANT!
Before you FLY for the first time,
to ensure a higher level of success and enjoyment, please do a
ground check of your Mini Robo Trike build, and setup or
allow me to do it for you via
Email. Email me high resolution photos or a video of
your build and setup and I will give it a final check for
you, or if you have last minute questions, don't hesitate
to ask.